This time, we will visit another machine learning compiler, Glow. The PyTorch community actively develops Glow; meanwhile, MLIR I’ve touched on in the previous posts is mainly built by the LLVM community. Glow is a compiler to lower the given machine learning model into the executable format on various types of hardware such as GPU, accelerators. It supports Caffe2 and ONNX for now.

As illustrated in the above figure, Glow converts the model into a high-level graph structure first. It keeps the abstract information for each operator and relationship so that Glow can do further optimization by utilizing that information.
Afterward, Glow converts the graph structure into an intermediate representation defined by Glow (Low-Level IR). It looks more similar to what we are familiar with. Although it lacks the high-level information retained by the graph structure, we can employ the state-of-the-art optimization method usually implemented in the standard compilers.
Lastly, the backend generates the machine-executable code from the IR. As is often the case with the compiler backend, the Glow backend is also pluggable to replace them interchangeably. But Glow supports the custom node in graph and instruction. In such a case, the backend is responsible for converting the custom node into the format executable of other hardware. As of today, Glow supports the following backend implementations:
Seeing is believing. Let’s take a look into how to generate Glow IR from a very tiny ONNX model.
One Linear Layer Model
We create the ONNX model with the following PyTorch code.
import torch
from torch import nn

class MyModel(nn.Module):
  def __init__(self):
    super().__init__()
    self.classifier = nn.Sequential(
      nn.Linear(10, 5),
      nn.Sigmoid()
    )

  def forward(self, x):
    return self.classifier(x)

  def save(self):
    input_names = ["input_1"]
    output_names = ["output_1"]
    dummy_input = torch.ones(3, 10)
    torch.onnx.export(self, dummy_input, "mymodel.onnx", verbose=True, input_names=input_names, output_names=output_names)

if __name__ == '__main__':
  model = MyModel()
  model.save()
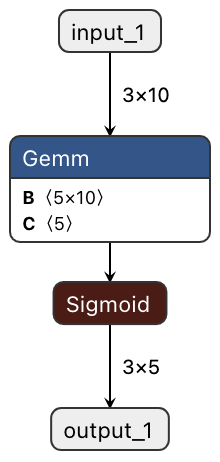
You can visualize the model with Netron as follows.
Glow allows us to compile the model with the model-compiler command-line tool. We can use a docker image provided by the community to launch the environment for Glow development. Since building the whole repository of Glow takes a far long time, I highly recommend only compile model-compiler for this case.
$ mkdir build_Debug
$ cd build_Debug
$ cmake -G Ninja -DCMAKE_BUILD_TYPE=Debug ../glow
$ cmake --build . --target model-compiler
Once the compilation for model-compiler is completed, we can compile our simple model previously built.
$ ./bin/model-compiler \
    -model mymodel.onnx \
    -emit-bundle ./mybundle \
    --backend=CPU \
    -dump-ir

function mymodel.onnx
declare {
  %classifier_0_bias = WeightVar float<5> const // size: 20 // Users: @in 0
  %classifier_0_weight__1 = WeightVar float<10 x 5> const // size: 200 // Users: @in 0
  %input_1 = WeightVar float<3 x 10> mutable // size: 120 // Users: @in 0
  %output_1 = WeightVar float<3 x 5> mutable // size: 60 // Users: @in 1, @out 0, @out 1

  ; size = 400 bytes
}

code {
  0 %Gemm_0__1 = fullyconnected @out %output_1, @in %input_1, @in %classifier_0_weight__1, @in %classifier_0_bias
  1 %Sigmoid_1 = sigmoid @out %output_1, @in %output_1
}
Great, we’ve done it!. dump-ir option of the model-compiler (and any other CLI tools supporting it) enables us to see the IR for the testing purpose.
For the detail of the IR, I’ll have another time to explain that.