TensorFlow.js is a framework that enables us to run a deep learning model in the web browser easily and efficiently. As you may imagine, tensor manipulation requires a huge amount of computation power. The defacto standard way for that is currently using accelerator such as GPU. GPU provides us with a large amount of parallelism so that we can distribute the tensor calculation in the multiple threads. TensorFlow.js make it possible even in the web browser by using WebGL. WebGL is a standard API to use GPU from web browser mainly for graphical processing. Thanks to WebGL, we can see the rich web contents smoothly. Chrome experiments shows a bunch of fun experience realized by using WebGL.
In this article, I’m going to briefly explain how to create a custom operator that is leveraged by WebGL acceleration in TensorFlow.js. This explanation based on the official documentation so please refer “Creating custom WebGL operations” more detail.
Table Of Contents
- Operators in TensorFlow.js
- Using WebGL as GPGPU
- Fragment Shader in TensorFlow.js
- Configuration of GPGPU Program
- Recap
Operators in TensorFlow.js
First, it’s necessary to know the structure of the kernel in TensorFlow.js. Each operator is implemented as the collection of multiple basic kernels. Kernels are the minimal unit of tensor manipulation. For example, tf.oneHot operator runs oneHot kernel implemented for CPU and WebGL respectively. If WebGL is available, TensorFlow.js chooses the WebGL backend transparently so that the application can be leveraged by WebGL acceleration without rewriting application code.
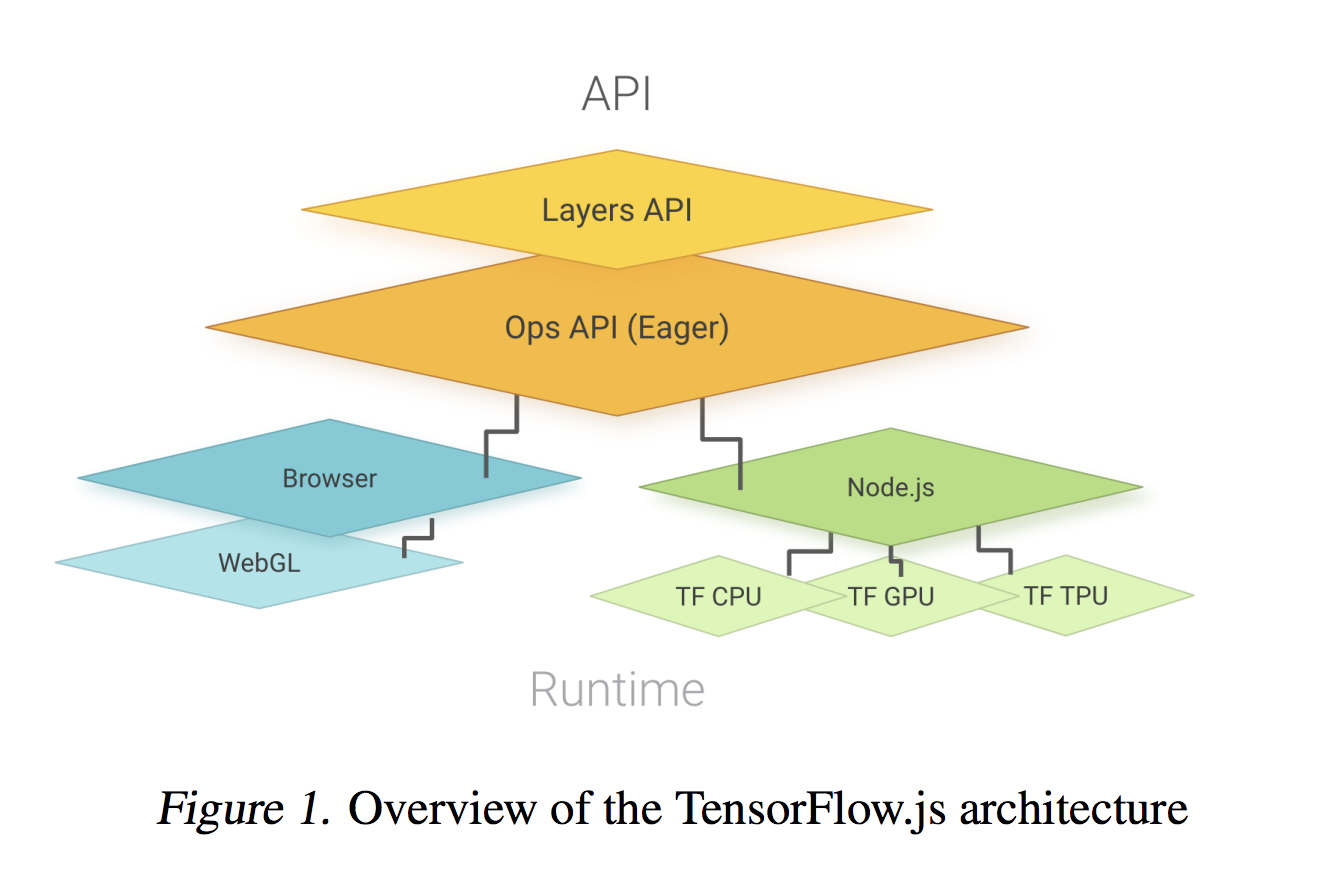
backend provides the interface to access the kernels. It has CPU and WebGL implementations. Once a kernel has WebGL implementation, it can be run on GPU without any modification to the above layer over backend.
import * as tf from '@tensorflow/tfjs';
// oneHot operator is executed by the backend implementation.
tf.oneHot(tf.tensor1d([0, 1], 'int32'), 3).print();
Currently, TensorFlow.js supports three types of backend officially.
- CPU
- WebGL
- Node.js
CPU is just a JavaScript runtime running in the web browser so it’s the slowest implementation. TensorFlow.js should fallback to this implementation if any other backend implementation is not available. WebGL will be described later. You can use TensorFlow core implementation via Node.js. TensorFlow provides C API so that it can be bound by any other languages which support C extension. Node.js backend delegates the computation to TensorFlow core. It indicates that we can use any kind of functionality of TensorFlow technically by using Node.js backend. If you are interested in Node.js backend, the detail is described in the repository.
So how does WebGL look like?
Using WebGL as GPGPU
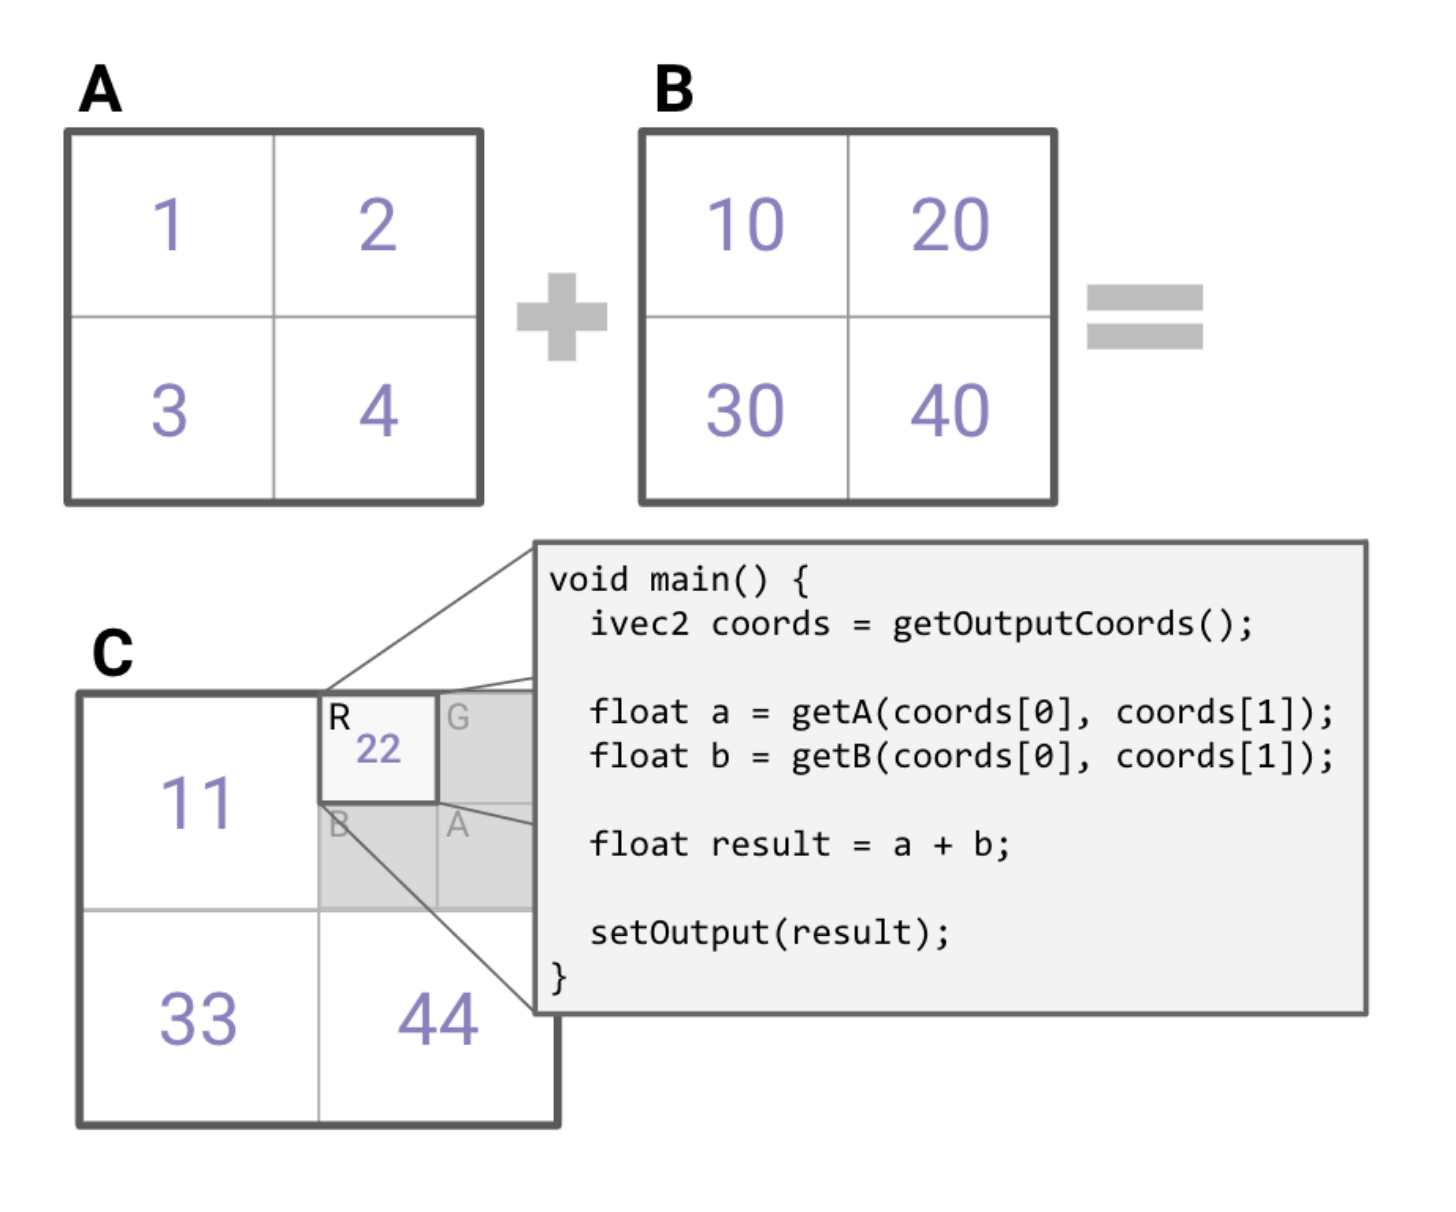
Since WebGL was originally designed for acceleration of graphical processing, it requires some tricky technique to use WebGL for tensor computation. Input tensors are copied as texture to GPU memory. It can be regarded as the simple square and the computation is executed as fragment shader in WebGL pipeline. The following example shows how adding two tensors is done in WebGL. As you can see, tensor A and tensor B are represented as 2x2 images in GPU memory buffer. Hence, each element of these tensors are the pixels of the texture. In general, the texture has RGBA in each element since it’s an image. But it is redundant and memory consuming when it comes to GPGPU case. In the environment supporting WebGL 2.0, gl.R32F texture type is used to avoid allocating memory space for green, blue and alpha pixels. So basically WebGL backend only uses R channel in the tensor computation.
Fragment Shader in TensorFlow.js
A fragment shader runs in parallel by each pixel, which is accelerated by underlying GPU threads. The function called in parallel in the fragment shader is named main. The main function in TensorFlow.js looks like for example.
void main() {
  // This is the 2 element vector representing the coordination of output position.
  ivec2 coords = getOutputCoords();

  // Get an element in tensor A whose position is exactly to the output.
  float a = getA(coords[0], coords[1]);
  float b = getB(coords[0], coords[1]);

  float result = a + b;
  setOutput(result);
}
This function is called in parallel so that the calculation of each tensor is much faster than single thread calculation by CPU. In order to mitigate the difficulty to write a shader program, TensorFlow.js shader compiler provides some utility functions such as getOutputCoords, getA etc. You can get an element from input tensor safely by using these functions. For example, getOutputCoords returns the position of the output element. By using that you can calculate the position of the input element. The previous code shows the example which is adding two tensors in element-wise. This is the core logic of fragment shader. But how can we decide the shape of the input and output? Can we specify the name of the input tensor?
Of course, you can by using GPGPUProgram class defined in TensorFlow.js.
Configuration of GPGPU Program
The interface of GPGPUProgram is defined as follows.
interface GPGPUProgram {
  variableNames: string[];
  outputShape: number[];
  userCode: string;
  supportsBroadcasting?: boolean;
}
variableNames is the name list of input variables. It is case insensitive. If you define variableNames = ['A', 'B'], you can get the element of these tensors by calling getA or getB. GPGPUProgram automatically creates the function referred by this name. You can define the shape of the output tensor by defining outputShape. If the output tensor is a 2x2 tensor, the outputShape will be [2, 2]. userCode is the shader code compiled by TensorFlow.js shader compiler.
Let’s say you want to implement a GPGPU program to calculate the squared value of each element. That program can look like this.
class SquaredProgram implements GPGPUProgram {
  variableNames = ['A'];
  outputShape: number[];
  userCode: string;

  constructor(inputShape: number[]) {
    // Element-wise operator generates the tensor whose shape is exactly same with the input one.
    this.outputShape = inputShape;
    this.userCode = `
      void main() {
        float a = getAAtOutCoords();
        float output = a * a;
        setOutput(output);
      }
    `;
  }
}
Since we defined variableNames as 'A', we can use getAAtOutCoords to get the element in A in the position same as the output position. If the function is called for the position [0, 2], getAAtOutCoords returns an element in the position [0, 2] in tensor A. The function is very helpful for us to write an error durable shader program. Other than that, there are several utility functions defined by TensorFlow.js side.
| name | functionality |
|---|---|
setOutput(float) |
Set the output value in the output position |
getOutputCoords() |
Get the coordination of the output position |
isNaN(float) |
Check whether the value is NaN or not |
round(float) |
Round value to the nearest integer |
Of course, you can use the standard GLSL functions such as sin or cos in GPGPUProgram. Please visit the official OpenGL specification for more detail about the available built-in functions.
Once you can create your own GPGPUProgram, TensorFlow.js can compile and run the program on behalf of you. For instance, running a program to add two tensors looks like this. Since compileAndRun is defined in the backend implementation, all you need to do is just passing your own program, input, and output.
const program = new BinaryOpProgram(binaryop_gpu.ADD, a.shape, b.shape);
const output = this.makeOutputArray(program.outputShape, dtype) as Tensor;
return this.compileAndRun<Tensor>(program, [a, b], output);
The code is available in src/kernels/backend_webgl.ts
Recap
In this article, I described how to write your own GPGPU program runnable in TensorFlow.js. It’s maybe topic diving into the internal of TensorFlow.js. If you are interested in the usage or application of TensorFlow.js, “Deep Learning in the Browser” is a good resource to learn that kind of thing. That covers the latest technologies to run a deep learning algorithm in modern web browsers.

I hope this book would be helpful for you to start the journey to the world of high-performance deep learning in web browsers. Thanks!